Azure Cosmos DB
Azure Cosmos DB is a planet scale, JSON based schema free, No SQL database with multi-API support.
Microsoft defines it as a globally distributed, multi-model database service that supports document, key-value, wide-column and graph databases.
In this column, I’ll attempt to demonstrate what a cinch it is to import SQL data into Cosmos DB. Please note, the two are not the same. The analogy to describe the two is akin to a hammer vs. an axe. Just like you cannot use a hammer to chop down a tree, similarly, you cannot use an axe to drill a nail into the wall.
What do I need:
- SQL Server Management Studio (SSMS)
- Azure Cosmos DB Data Migration Tool
- Azure Cosmos DB Emulator
Azure Cosmos DB Data Migration Tool (DTUI)
DTUI is a data migration tool that is an open source solution used to import data to Azure Cosmos DB from a variety of sources that include the following:
- JSON files
- Mongo DB
- SQL Server
- CSV files
- Azure Table Storage
- Dynamo DB
- HBase
Azure Cosmos DB Emulator
According to Microsoft docs, the Azure Cosmos Emulator provides a high-fidelity emulation of the Azure Cosmos DB service. It supports identical functionality as Azure Cosmos DB, including support for creating and querying data, provisioning and scaling containers, and executing stored procedures and triggers. You can develop and test applications using the Azure Cosmos Emulator, and deploy them to Azure at global scale by just making a single configuration change to the connection endpoint for Azure Cosmos DB.
To download and install the Azure Cosmos Emulator, you can use this link.
Migrating Data
To migrate SQL data, we would need data. For the purposes of demonstration, I am using Adventure Works database, a Microsoft sample database that you can download here.
The Process
Let’s open SSMS and use one of the Views. A typical View is created by joining multiple related tables together. The View that is being used in this example is Purchasing.vVendorWithAddresses, where Purchasing is the name of the schema.
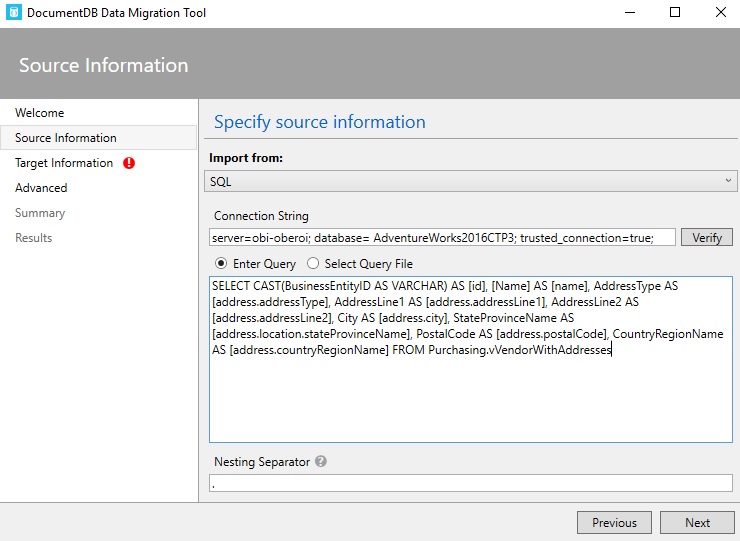
This View contains information about Vendor with Addresses in each row such that each of these rows can be mapped to a self-contained JSON document once the migration completes. Notice the column names that are defined as aliases. There’s also a “.” which is used as a separator to split address into address type, city, location etc. In other words, this will help shape the JSON document to transform each row into a complex JSON document instead of a flat document containing simple properties.
Although the “.” is irrelevant to SQL, however, it is used to tell the migration tool how to shape the documents that are being imported.
SELECT
	CAST(BusinessEntityID AS VARCHAR) AS [id],
	[Name] AS [name],
	AddressType AS [address.addressType],
	AddressLine1 AS [address.addressLine1],
	AddressLine2 AS [address.addressLine2],
	City AS [address.city],
	StateProvinceName AS [address.location.stateProvinceName],
	PostalCode AS [address.postalCode],
	CountryRegionName AS [address.countryRegionName]
FROM
	Purchasing.vVendorWithAddresses
The next thing you want to do is to open the Migration Tool utility and start configuring.
Source Info
Here you will specify the API to import from, i.e. connection string, query and the nesting separator. See image below:

Target Info

Use the Azure Cosmos DB Emulator to copy the connection string (circled in red above).
One of the things you ought to keep in mind when creating a container is to define its partition key. Typically, this is a property you choose that will help scale your data both in terms of storage and throughput.
In our case, we have chosen “/address/postalCode” as the partition key.
Note: It may be noted that the name of the column defined in SQL query is case-sensitive in order for it to be recognized when transforming the query results into Cosmos DB documents.

When you click Next, you’ll be presented with an Advanced tab. Skip this section by clicking Next.
Now you will be on the Summary page where you can review all that you have configured in the previous steps. Once you are sure, click the Import button.
The tool will import the records and transform them to documents. In this case 104 of them. See below:

Now, let’s flip over to Azure Cosmos DB Emulator. Refresh the page and you’ll see the newly Created Database, Collection and Documents. See below:

Query the Data:
With the power of SQL API that Cosmos DB supports, you can query your data just as you would if you were in SSMS. See the query below:

Output:

Summary
Here, we saw the use of SQL API and how it can be used to model data as JSON documents. We made use of a view in SQL database, massaged it and transformed the SQL records into Cosmos DB documents following some easy steps.
Resources
- Azure Cosmos DB
- Azure Cosmos DB Data Migration Tool


